This is the practical, click-by-click guide to getting OpenAI Ads conversions flowing from your WordPress store. By the end you’ll have created your pixel inside OpenAI Ads Manager, generated a Conversions API key, connected both to the Measurement Pixel for OpenAI Ads PRO plugin, and confirmed that events are arriving. No code, and nothing you can’t undo.
If you’re not yet sure what a “pixel” or “Conversions API” is, the complete WooCommerce tracking guide explains the concepts in plain English. This article assumes you just want it working.
What you’ll need
- A WordPress site with the Measurement Pixel for OpenAI Ads PRO plugin installed and active
- Access to your OpenAI Ads Manager account at ads.openai.com (currently US-based advertisers)
- About ten minutes
The setup has two halves. First you create two things inside OpenAI Ads Manager — a Pixel ID and a Conversions API key. Then you paste both into the plugin and test. Let’s go in order.

Step 1 — Create a Data Source (your pixel) in OpenAI Ads Manager
A “Data Source” is OpenAI’s name for the pixel — the destination your conversions will be sent to.
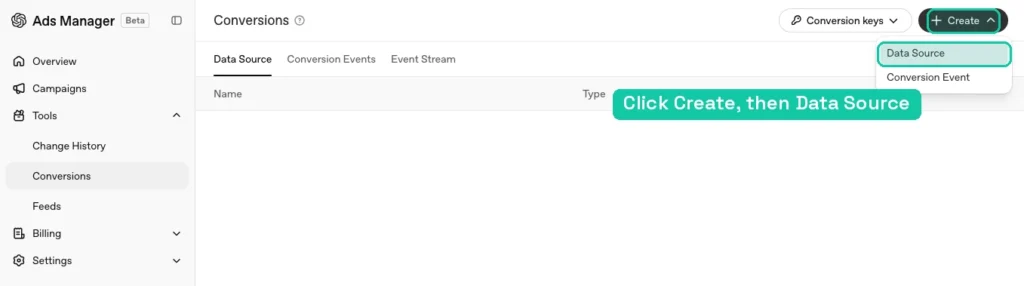
In Ads Manager, open Tools → Conversions, then click Create in the top right and choose Data Source.
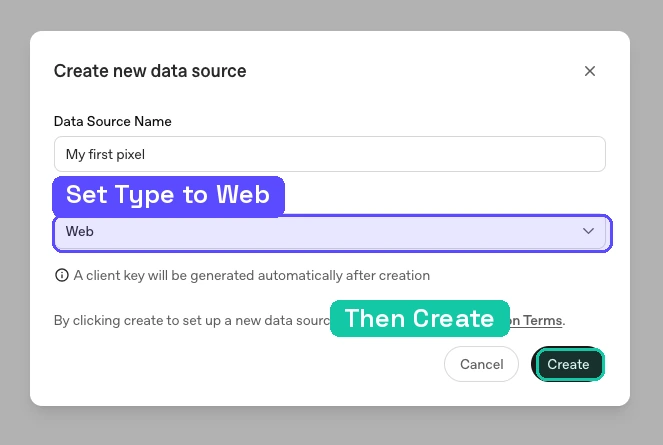
Give it a name you’ll recognise (for example, your store name), and set Type to Web, since you’re tracking a website. Click Create.
OpenAI now shows you a setup screen with a block of code, a Pixel ID, and an example event call.
Here’s the important part: you can ignore the code block. That snippet is for people installing the pixel by hand. The plugin installs and fires the pixel for you, so the only thing you need from this screen is the Pixel ID — the short string near the top. Copy it.
You’ll also see buttons like “Next: create conversion event.” You can skip that for now; you’ll choose which action counts as your conversion later, when you build a campaign. Right now we just need the pixel connected.
Step 2 — Create a Conversions API key
The Pixel ID covers the browser side. The Conversions API key unlocks the server side — the more reliable route that reports sales directly from your store, even when the browser is blocked. (More on why both matter in pixel vs Conversions API.)
Back on the Conversions screen, open the Conversion keys dropdown in the top right and click Create new key.

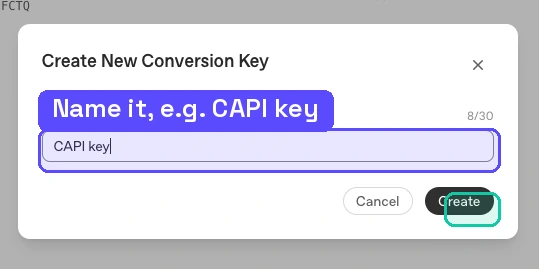
Give the key a name — something like “CAPI key” — and click Create.
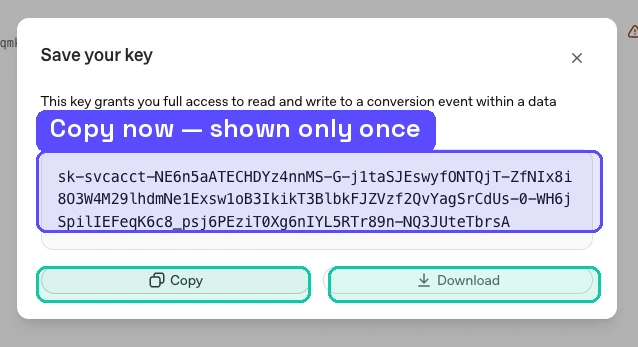
OpenAI now shows you the key once. It starts with sk-svcacct-… and it’s long. Copy it now or download it — you won’t be shown the full key again. Treat it like a password; anyone with it can send events to your account.
Step 3 — Connect both to the plugin
Now switch to your WordPress admin and open Measurement Pixel in the sidebar. This is where the two pieces come together. Remember: you have to install and activate Measurement Pixel for OpenAI Ads PRO first.
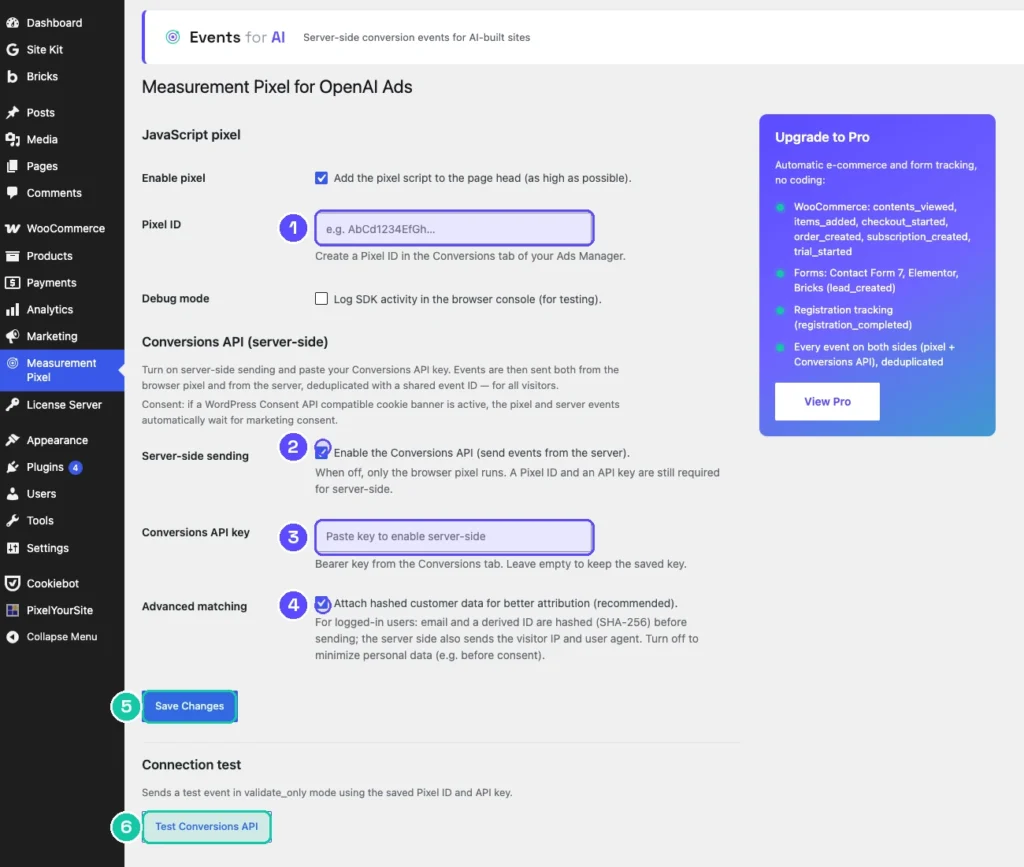
Work top to bottom:
Enable pixel — tick this so the plugin adds the pixel script to your pages. Leave it on.
Pixel ID — paste the Pixel ID you copied in Step 1.
Debug mode — leave this off for now. It’s only for testing; turning it on logs activity to the browser console so a developer can watch events fire.
Server-side sending — tick Enable the Conversions API. This turns on the reliable server route. (You still need a Pixel ID even for server-side, because both routes report to the same pixel.)
Conversions API key — paste the sk-svcacct-… key from Step 2. If you ever re-save the page and leave this field empty, the plugin keeps the key you already saved, so you don’t have to paste it every time.
Advanced matching — this attaches a scrambled (hashed) version of a logged-in customer’s email and a derived ID, plus the visitor’s IP and browser, to help OpenAI credit the sale to the right ad click. It’s recommended and privacy-preserving, since the email is hashed before it leaves your server. If you want to minimise the personal data you send — for example before a visitor has given consent — you can turn it off. There’s a deeper look in advanced matching.
Click Save Changes.
Step 4 — Run the connection test
At the bottom of the settings page there’s a Connection test with a Test Conversions API button. Click it.
This sends a single test event in “validate only” mode — meaning it checks that your Pixel ID and key are correct and that OpenAI accepts the event, without recording a real conversion. If it comes back successful, your server-side connection is wired correctly. If it fails, jump to troubleshooting below.
Step 5 — Confirm real events are landing
Place a small test order on your store (or use a sandbox/test payment), then return to Tools → Conversions in Ads Manager and look at your Data Source.
When you first create a pixel, its status shows a warning and 0 events — that’s normal; it just means nothing has arrived yet. Once a real action fires, the event count starts climbing and the status clears. There can be a short delay, so give it a few minutes before worrying.
That’s it. The plugin now reports your store’s conversions to OpenAI through both routes, deduplicated automatically.
Troubleshooting
The test fails or the status stays as a warning.
The most common cause is a copy-paste slip in the Pixel ID or the key — an extra space or a missing character. Re-copy both and save again. A wrong Pixel ID won’t show an error; events just go nowhere, so double-check it against Ads Manager.
Events stay at 0 after a real order.
Confirm “Enable pixel” and “Enable the Conversions API” are both ticked and saved. If you use a cookie banner, remember that tracking waits for marketing consent — if you declined it while testing, nothing fires. See OpenAI Ads, consent & GDPR.
You lost the API key.
You can’t view an old key again. Just create a new one (Step 2) and paste it into the plugin; the old one can be deleted.
The order value looks wrong in reporting.
Values are sent in the smallest currency unit, so $25.99 is recorded as 2599. The plugin handles this conversion automatically — if you also installed a manual snippet, remove it to avoid sending the order twice with mismatched values.
Frequently asked questions
No. The plugin installs and fires the pixel for you. From OpenAI’s setup screen you only need the Pixel ID; ignore the code block and the example event call.
For the strongest setup, yes. The Pixel ID enables the browser route; the key enables the reliable server route. You can run with just the pixel, but you’ll miss conversions lost to ad blockers and privacy settings.
The key is stored in your site settings and only used server-side to send events to OpenAI. Treat it like any password: don’t share it, and if it’s ever exposed, delete it in Ads Manager and create a new one.
No. The plugin sends the same order from both routes with a matching ID, and OpenAI counts it once. Problems only appear if you also run a second, manual tracking setup alongside the plugin.
You select that when you set up or optimise a campaign in Ads Manager. The plugin sends all your standard events; you decide which one to optimise toward.